VI TIPS & TRICKS A
I had to delete some tips because they were definitely outdated.
That's why the numbering of the tips starts with 21... Please do not let this bother you. Thank you!
Contents
21. Up-Stroke / Down-Stroke (I)
22. How to play live the VSL Organ?
23. Adjusting the Brightness of VI & VIPro
24. A) How does the X-Fader-Velocity work? (I)
24. B) How does the X-Fader-Velocity work? (II)
24. C) How does the X-Fader sound? (Practice)
25. How To Intergrate VI Into Cubase
26. Upstroke / Downstroke / Legatos (II)
27. Find a transparent arrangement...
28. What means "Sampling Frequency"?
- 21.
- 22.
- 23.
- 24. A)
- 24. B)
- 24. C)
- 25.
- 26.
- 27.
- 28.
21. Up-Stroke / Down-Stroke
Many musicians have the question "How can I set the bow direction of the String-Samples?"
We can't control the bow direction with the VI. There are some variations for certain samples but the Vienna Instrument chooses them automatically.
Even if we could select a sample which was recorded with "up- or down- bow" I believe that the difference of the sound between such samples isn't that big.
I assume that the continual change of articulations and also of the volume has more influence on the result than different samples for up and down stroke.
The following excerpt of Mendelssohn’s Violin Concerto in e-minor shall prove this thesis.
bk_up_down_bow.mid [4 KB]
/ bk_up_down_bow.mp3 [634 KB]
/ bk_up_down_bow_3.gif
bk_up_down_bow_1.jpg
/ bk_up_down_bow_2.jpg
/ keyswitches-organisation-vi-solo-violin.pdf [23 KB]
Clicking on the images below will enlarge them...


You have the possibility to download the midi file. The notes below the melody are key switches.
Each key switch means "another articulation".
Check also the variation of the velocity between the notes (with the midi-file).
All of these matters lead to a natural result.
So up- and down- bow samples are not really necessary any more.
Precondition for good results: You need to have a lot of different articulations (...Extended Library).
Key Switches (pdf) [23 KB]
used for this piece
Another Example
Give the "Downbow-Note" a bit more an accent (higher velocity level) and you will get a nice simulation of "downbow"
Leroy Anderson, arr. B. Kaufmann
The Typwriter
To the top of VI TIPS & TRICKS 3
22. How to play live the VSL Organ?

Preparing stop-combinations for each manual
The new VIPro-Player enables us to load up to 8 articulations (stops) into one cell.
So let us open for example 10 matrices. or more.
Using the "PRG" - function you are able to set up to 127 Stop-Combinations.
After that you can select them by choosing the midi-program slection.

Let us fill always 1 to 16 stops of the VSL Konzerthaus Organ into the first cell (A1).
You can adjust the volume of each stop within the combinations.
This gives us the possibility to prepare a huge amount of "Stop Combinations".

If you want to play the Konzerthaus-Organ live you need to use a DAW (Logic, Cubase,...) or a the Standalone version of Vienna Ensemble (Free and Pro).
So you are able to controll each Manual with a Midi Channel. Please compare the image on the right by clicking on it.
See also at Konzerthaus Organ.

Just as the real Organ-Player of the Konzerthaus-Organ: You are able to save several mixes of different stops now.
The real organ player switches between the presets by pressing buttons. You do it as well by "pressing" midi program changes.
HOW DOES IT SOUND?
Using a lot of different Presets leads to an interesting organ sound.
Such sounds are using by modern Organ Players such as Cameron Carpenter and others
Listen to the short Demo of the Project beside.
Louis Marchand: Basse de trompette, VSL Konzerthaus-Organ, INSP:IR Esztergom Basilicata
Download: bk_marchand_konzerthaus.mp3 [3838 KB]
23. Adjusting the Brightness of VI & VI Pro
Good News: You are able to adjust the Brighness of VI and VI Pro.
Follow the steps below
| S T E P - 1 | S T E P - 2 | S T E P - 3 |
| Click on the "Sprocket-Wheel" Icon | Click on "Adjust Brightness" |
You will find your solution by trying out the three shifters... Happy? Click on "Close". All following instances will open with your settings. |

|

|

|
24. A) How does the X-Fader-Velocity work? (I)
First: Let us study the selection of the layers and the creation of a final sound with a corresponding volume:
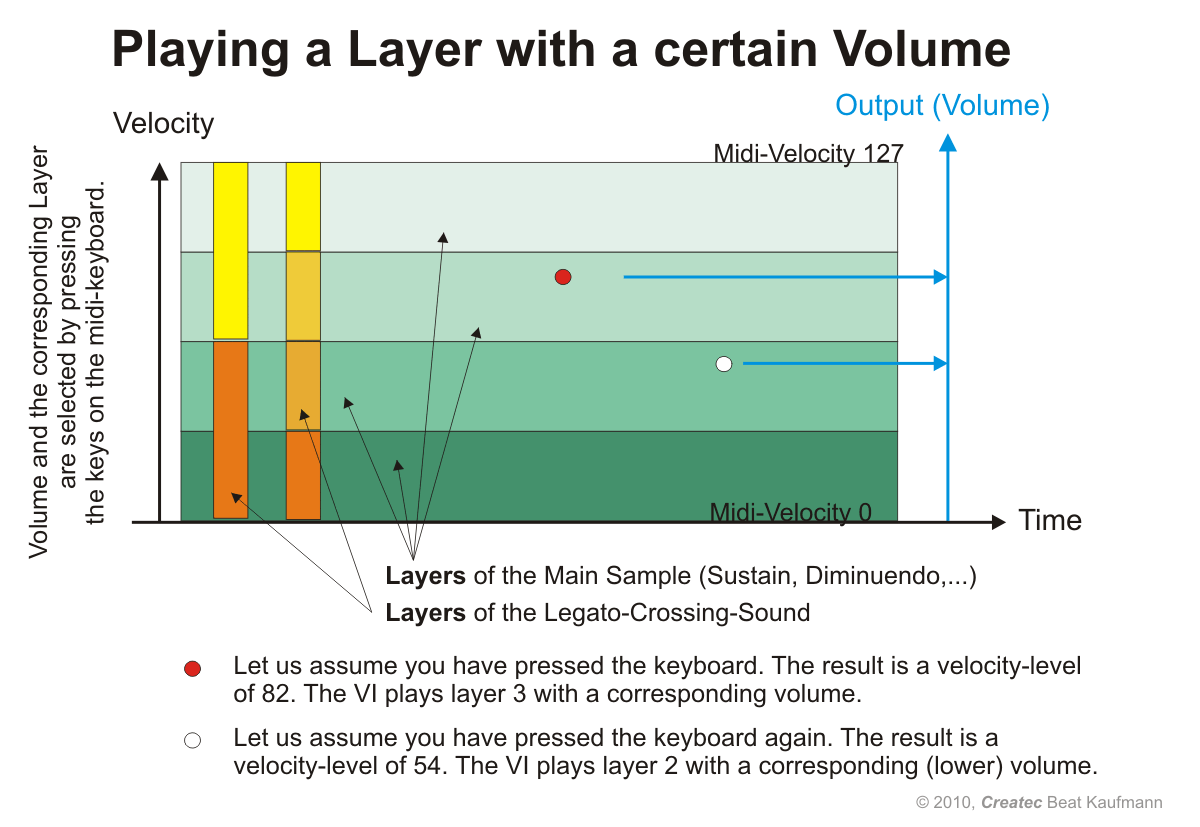
In both cases it also selects the corresponding «legato-crossing-sound».
Some samples come with 4 layers but only 2 layers for this «crossing-sound». For example: Appassionata "perf Legaoto Sustain 4Levels". There are only two legato-levels. These are more spreaded then.
They are used for two layers of the main sample.
24. B) How does the X-Fader-Velocity work? (II)
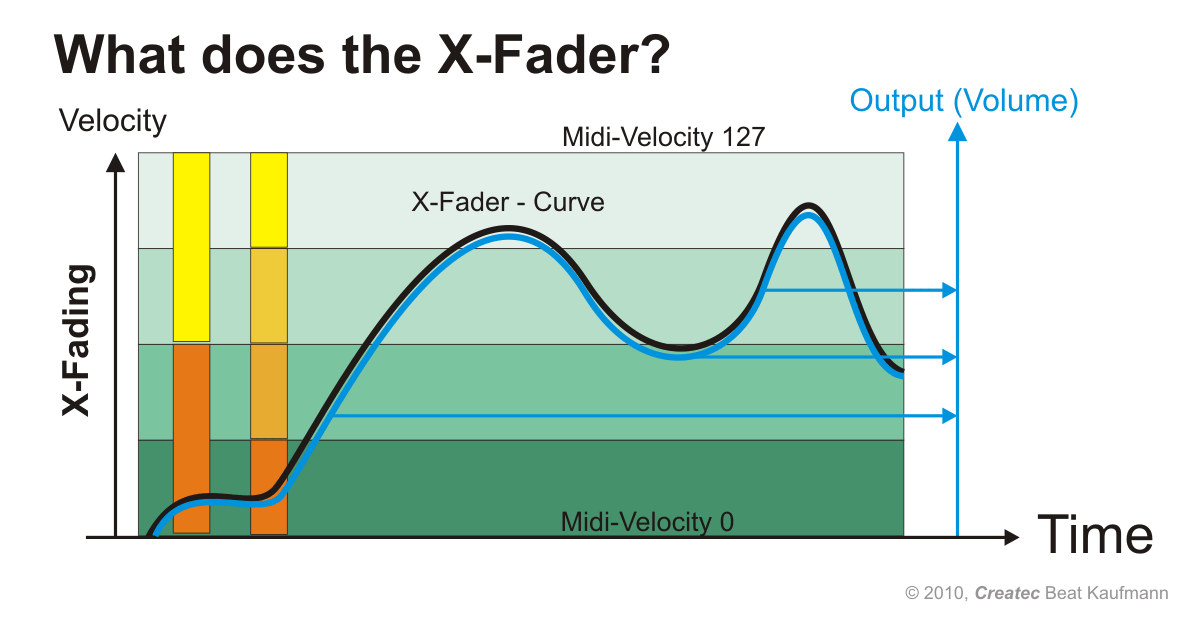
The X-Fade-Velocity function works quite similar as the keyboard does. But there are two main differences:
1. You can in- and decrease the volume at any time - not only by pressing on a key
2. The Vienna Instrument fades the sound between the layers. So you don't have acoustic "jumps" between two different sounding layers with X-Fade as we get it sometimes with the midi-keyboard between 88 and 89 for example.
That's the theory.
Nevertheless, based on practical work with the X-fader it is sometimes a bit tricky as well to find a good curve between two layers.
The more layers we have the better.
24. C) How does the X-Fader sound? (Practice)
How does the X-Fader sound? (Practice)
A) Music with - K E Y - V E L O C I T Y
>>> The Key-Velocity is usefull for SHORT ARTICULATIONS !!
The following piece only contains one articulation: STACCATO. It perfectly demonstrates the different layers of this articulation using the keyboard velocity.
B) Music with - XF - V E L O C I T Y
>>> The X-Velocity is usefull for LONG SOUNDING ARTICULATIONS! (sustain, legato,...)
When you have pressed the keyboard key the sustain articulation, as an example, holds the volume on a static level. This doesen't sound very musically. A real musician would chanche the dynamic of long notes in most of the cases. That's the moment for using the "X-Velocity".
Example:
You see the played notes (red bars) and below the velocity curve (drawed with the tools of cubase in this case) on the picture below. It is the curve of the violin 1 of the piece which you can listen to as well.
The curser of the player nearly follows the velocity curve...

25. How To Intergrate VI Into Cubase
This is a very often asked question of beginners.
Here you get short instructions by 10 images (10 Steps). Download the images: createc_inserting_vi.zip [1555 KB]
We assume that we have some Midi-Tracks. Each we want to connect with its own VI
A) Open the Window "VST-Instruments"
B) for 5 Midi-Tracks you insert 5 VIs
C) then you connect each VI with the corresponding midi track
D) Load the samples for the bass into the VI which is connect with the bass-midi-track and so on
E) Within the Midi-Tracks you insert all the controllers which are necessary for controlling the corresponding VIs.
Keep in mind that the midi-channel information do not have any influence on the VIs
Click onto an image for enlarging it...


I'm sure that it works very similar for other DAWs
The following section is a short excerpt of a former Tutorial (currently no more available).
26. Upstroke / Downstroke / Legatos
Every instrument has its particular nature and also the technique how to play it. The sound of Strings - Violins, Violas, Cellos and Double Basses - is usually formed by moving the bow to and fro, up and down. So there is a point where the string player has to change the
bow direction. Normally he is doing this between two notes or at the beginning of a bar. Further: It looks not very good when every player in an orchestra does it at his own discretion. So the leader of the orchestra fixes the ups and downs in the score.

|

|
|
| Bow down /down stroke | Bow up / up stroke |
I have done this for the melody of our learning piece as well.

Simulating the up and down bow
The "bow beginnings" have an influence on the sound and therefore on the handling of the sample articulations. In practice it is not possible to play endless legatos because of this changing the bow direction.
Download: Melody SoloViolin.mp3 [782 KB]
27. Find a transparent arrangement...

The following "video" is out from Tutorial 2009 (Chapter Additionals)
It shows on the one hand how to arrange pieces that no instrument covers an other.
On the other hand it also shows how different depths can enhance the transparency of complex mixes just as the image on the right it shows as well.
In this case we have a Band together with an orchestra (Drums, Bass and so on)
When you listen to mixes of the London Symphonic Orchestra and others we often can make out that the Instruments of the Band are in its "own room".
So I tried to reach this as well with some nice results...
If you are using MIR you still can mix the orchestra in it but mix the band within its own "room" (just with an Algorithmic Reverb for example).
As you can listen to the example: The sound keeps clear at any time.
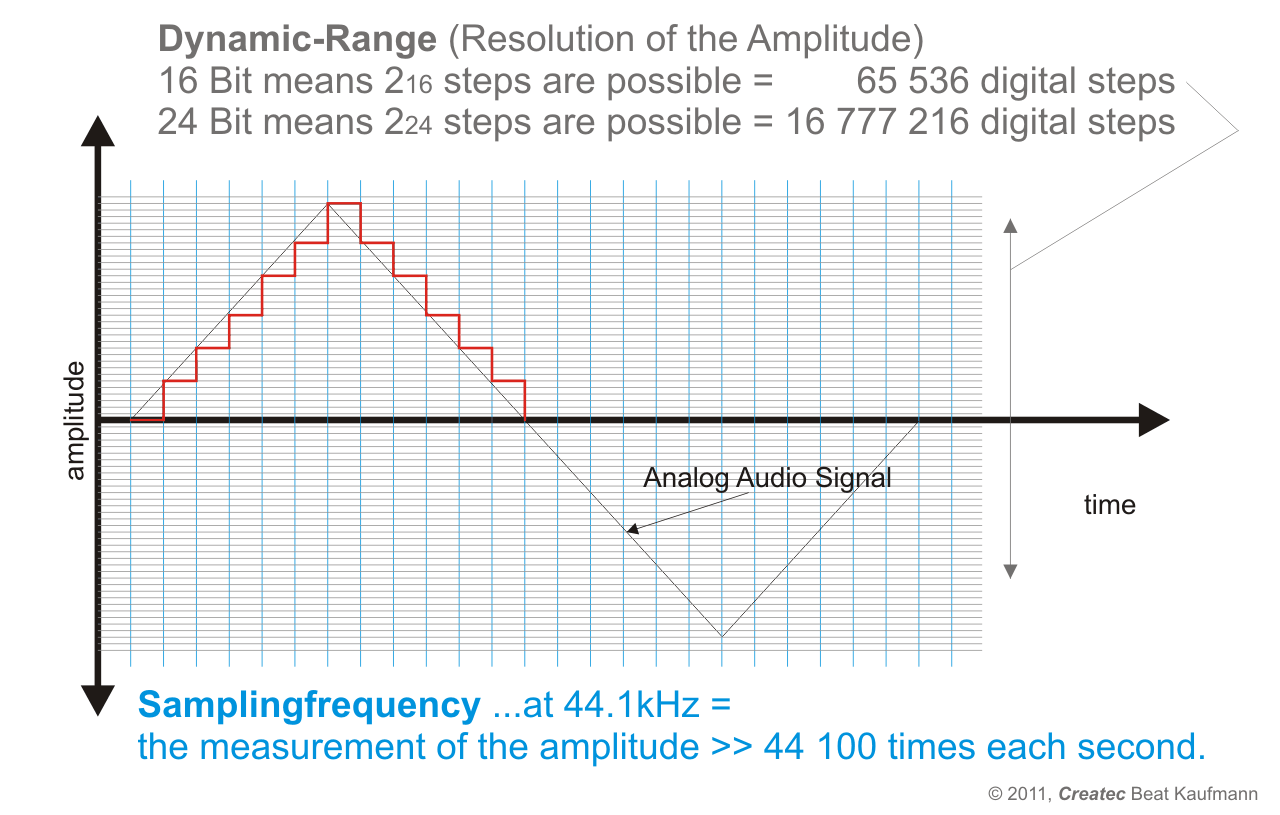
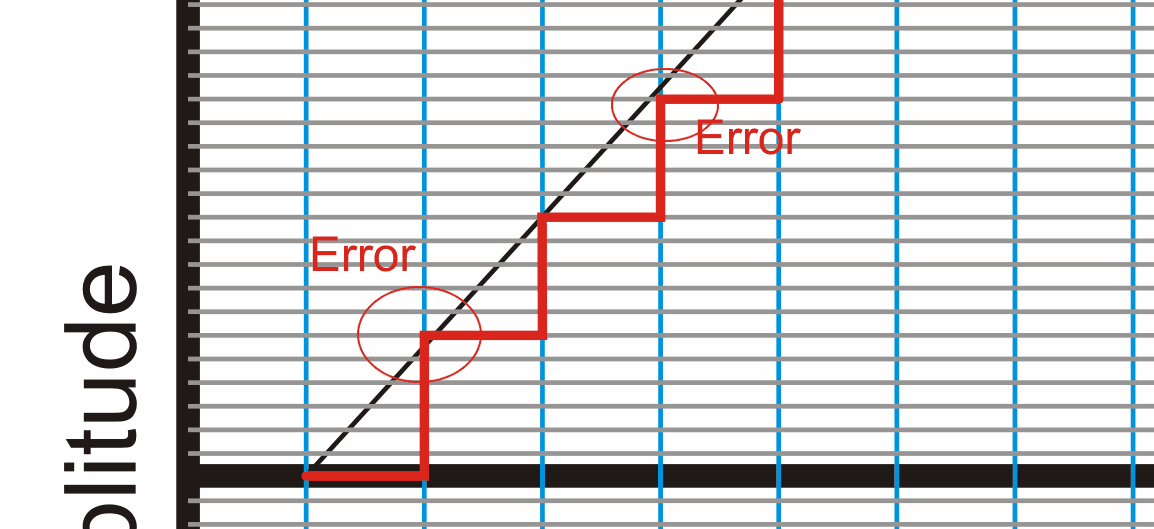
28. What means "Sampling Frequency"?
First of all, a short overview, what about we talk:
|
|
Click on the Images for enlarging them...
Left Picture
The image shows that the audio signal is measured a certain times per second (Sampling Frequency). So we are getting a "Sample" 44100 times per second - for example. The red signal is the digitalized audio signal.
Right Picture
It shows us: The faster we take samples (higher sampling frequency) and the smaller the distance of the vertical possibilities (dynamic steps = Bit Resolution) the more precise we get a digitalized copy of the audio signal.
A high sampling frequency and a high dynamic (Bit-Resolution) lead to smaller faults while digitalizing.


What's the goal with higher Sampling Rates
With higher Sampling Rates than 44.1kHz we can get/record higher frequencies than 20kHz.
The frequency responce of an Audio Interface shows this clearly:
5 Hz - 20,4 kHz (Sampling Frequency 44.1 kHz)
1 Hz - 43,3 kHz (Sampling Frequency 96 kHz)
When we reduce the higher sampling rate down to 44.1 kHz for example we will lose again these higher frequencies - but for all the treatments (effects) of our signal before we could use the higher quality of the signal...
So what shall we choose?
It depends on the product you want to have in the end.
For normal cases we should use 44,1kHz/24dB instead of 44,1kHz/16Bit.
For an even better quality you can increase the sampling rate as well up to 88,2/24Bit or 96kHz/24Bit.
192kHz/24Bit or 192kHz/32Bit is going too far in most cases.
A practical rule for your important projects could be:
1. If you are working for a CD (16Bit) choose 24 Bits.
2. For an even better quality:
Choose the sampling frequency twice as much (or more) as you finally use it.
Example for a CD which is 44.1kHz/16Bit :
88,2 kHz/24Bit or 176,4kHz/24Bit
There are a lot of discussions in the net around the correct higher sampling rates. Finally it depends on the possibilities of your system, on the resampling method and of course on the final product you need.
The following link gives an overview: http://en.wikipedia.org/wiki/Sampling_rate
© Copyright, Createc Beat Kaufmann, 2004 - 2025