Mini Mix of BWV 29, Sinfonia, (English)
- Intro
- 1. set up the mixer
- 2. Strings
- 3. Solo-Strings
- 4. The brass instruments
- 5. Organ & Timpani
- 6. Final tasks
Important to know in general...
Orchestras can be mixed in different ways. The concept used here means that...
A) ...instruments are first combined into groups (group channels) (strings, woodwinds, brass instruments, percussion, etc.).
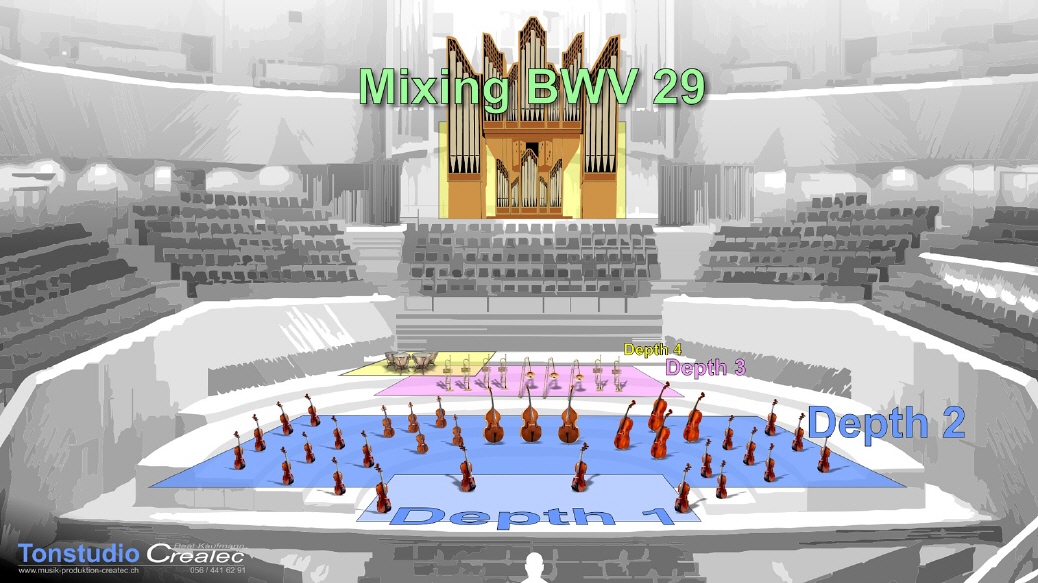
B) ...depending on the stage depth, 3 to 5 predefined room depths are created (also in respective group channels).
C) ...the groups summarized under A are looped through the corresponding room depth to the output, so that instruments play at the acoustically “correct” stage depth.
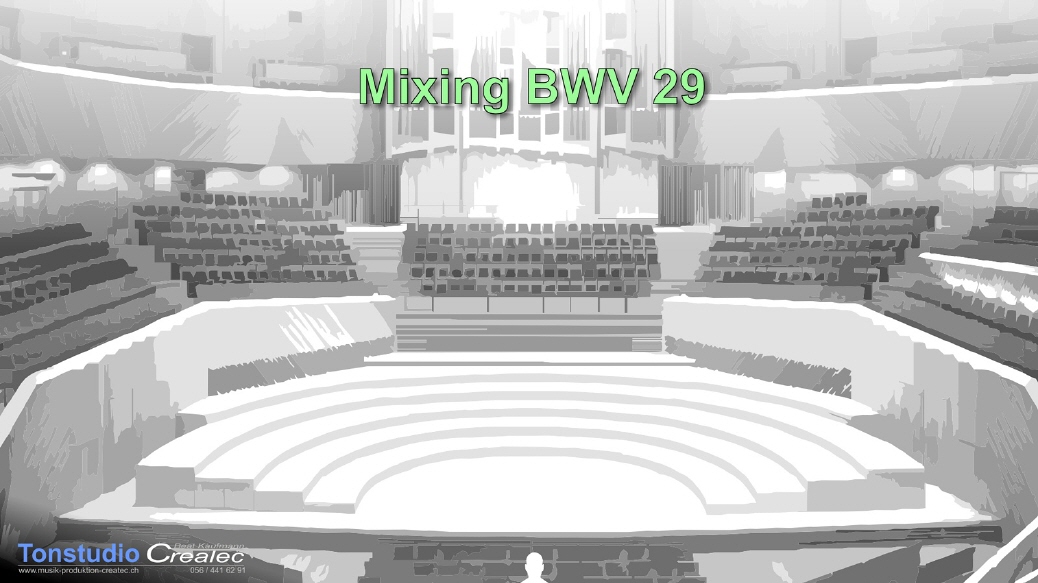
Stage depth without reverb tail

The diagram shows how to organise the mixer structure in the DAW. This applies in principle, even outside of the mix here by J.S. Bach. Because the mix concept works with predefined ‘acoustic depths’ (Depth1 to...), the ‘SEND’ function is not required. This function is replaced by positioning each instrument at its predefined stage position (room depth) by selecting the correct ‘Depth’. Whether the instrument plays left, right or in the centre is determined by the panning in the instrument channel itself.
Attention: It is important that the individual room depths are ‘constructed’ without reverb tails if possible. Below you can download an IR with which you can create such ‘dry’ room depths. If you have done it correctly, your instrument will sound like this at different room depths:
Reverb tail at the end

The reverb tails omitted from the room depths are of course already added. But only once - in the output channel. This has the advantage that the mix remains transparent because reverb tails are not added from every single instrument. The second advantage is that this one reverb tail in the output channel blends the whole mix together nicely. This is also known as ‘gluing together’. Another great thing about this mixing concept is that although the distant instruments (e.g. percussion) sound distant, they don't ‘drown’ in thick and long-lasting reverb tails at the same time, as is sometimes the case with other mixing concepts.
Practice makes perfect

So that what I have written so far does not just remain theory, you can join me in trying to recreate the mix of the Bach cantata BWV 29 (Sinfonia). The aim is to convert the graphic situation in the picture on the right into an acoustic mix. You can find the necessary files here.
- ir-for-creating-depths.zip [266 KB]
- bach_bwv29_minimix.zip (ca. 320MB Audio Files)
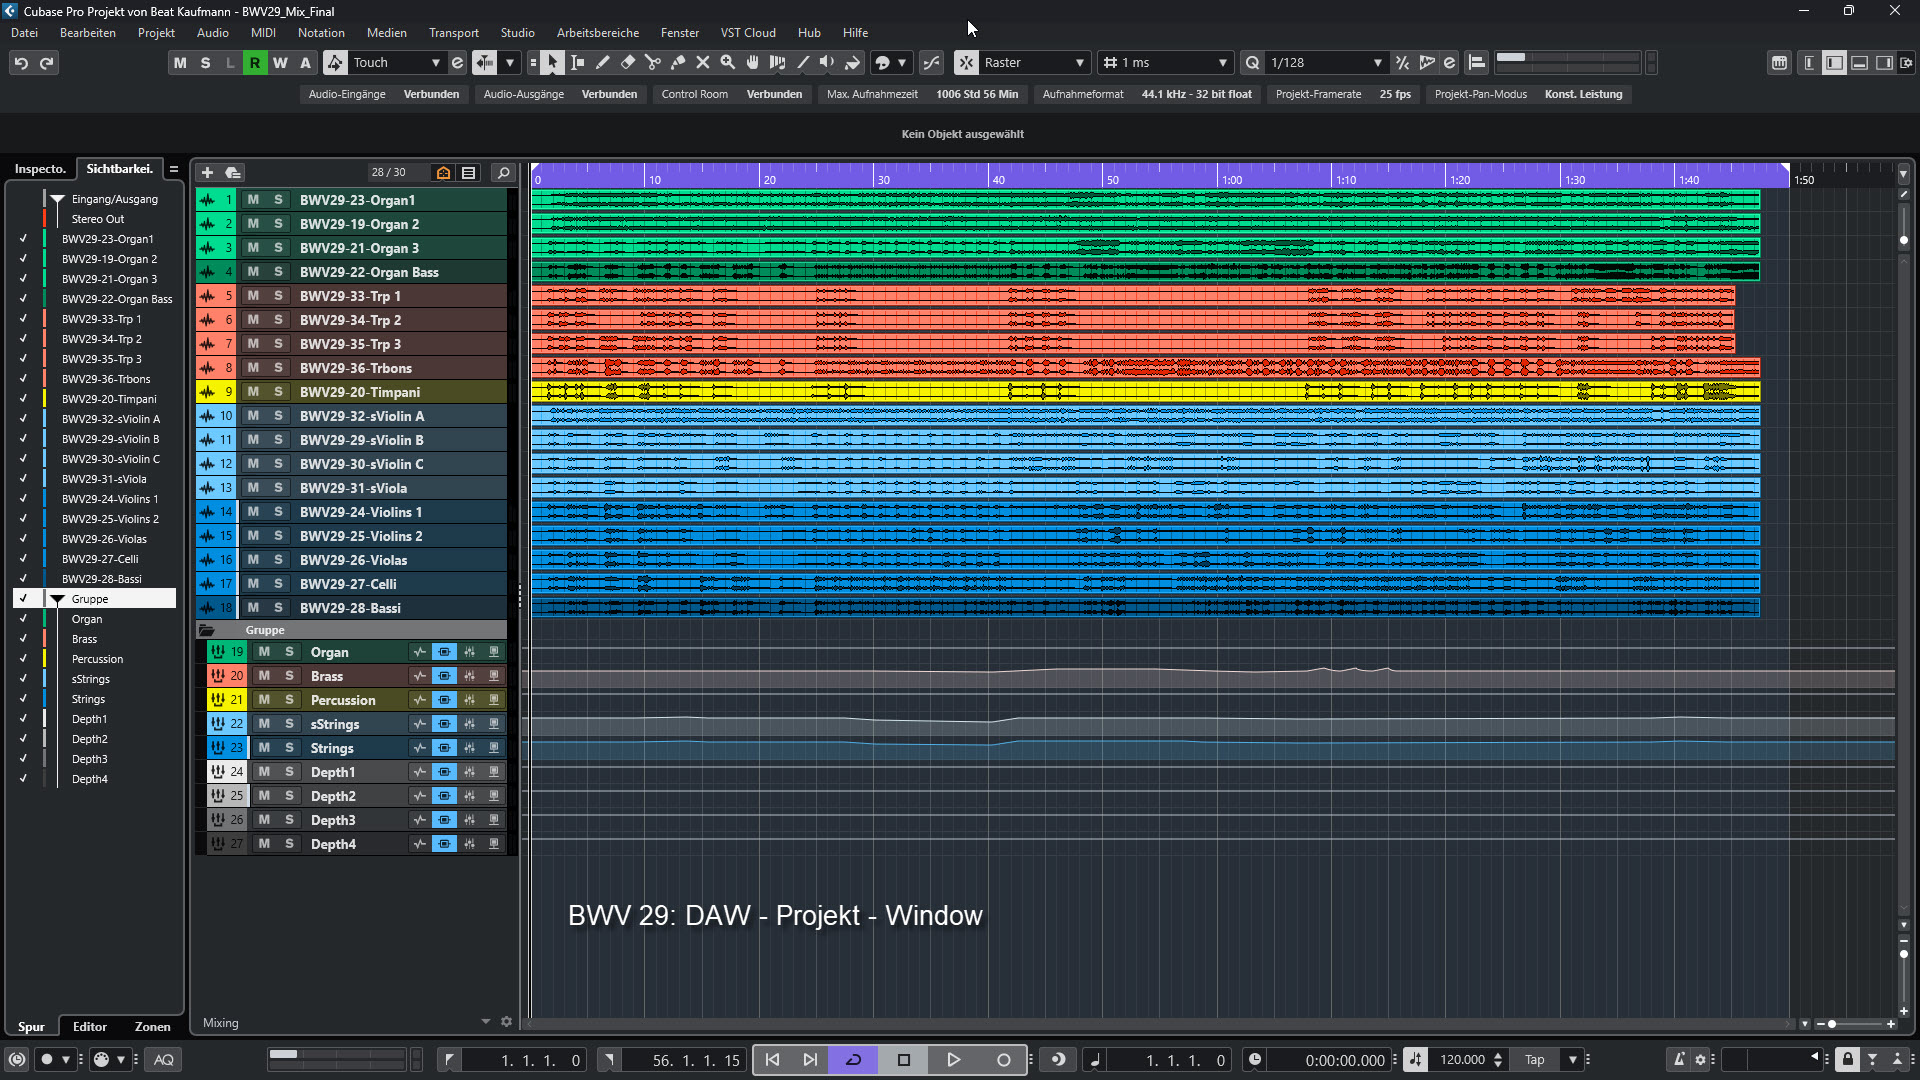
As a first step:
Drag all audio files into your DAW. Arrange them in a logical order (sequence) and colour them if necessary for a better overview.
If you now press play, you will hear all the files unmixed.
As you will notice, these are “dry” samples, i.e. without room information.
Sound of the files without mix...
We want to achieve this or a similar mix...
Once you have dragged the audio files into the DAW and organised them, you must first set up the mixer. When you later pan the instruments to their location on the stage, this should already be done using the correct room/stage depths. If you were to assign the correct room depth to the instruments later, you would have to start panning all over again.
To make the right connections, you can draw a mixer circuit diagram for the first few times, as shown on the right.
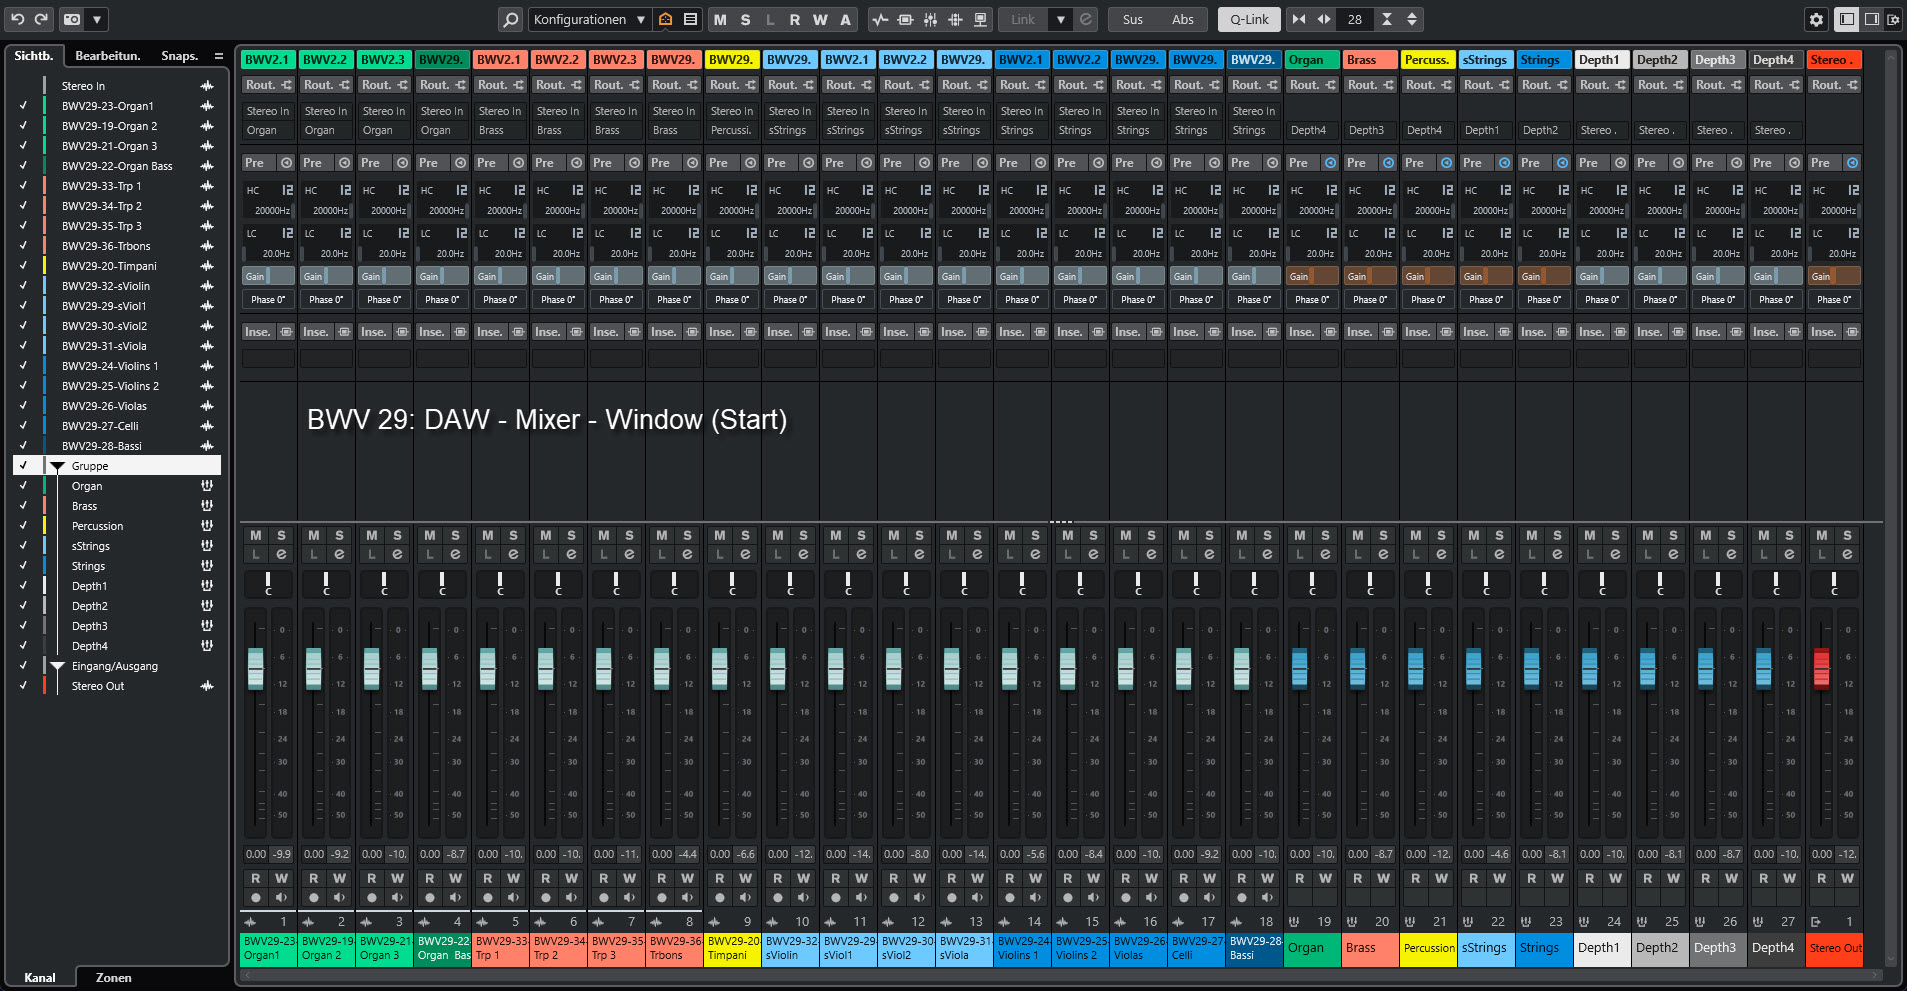
How to create group (sum) channels, how to route audio channels into a group channel, how to route a signal from one group channel to another... you have to find out all this for your DAW yourself.
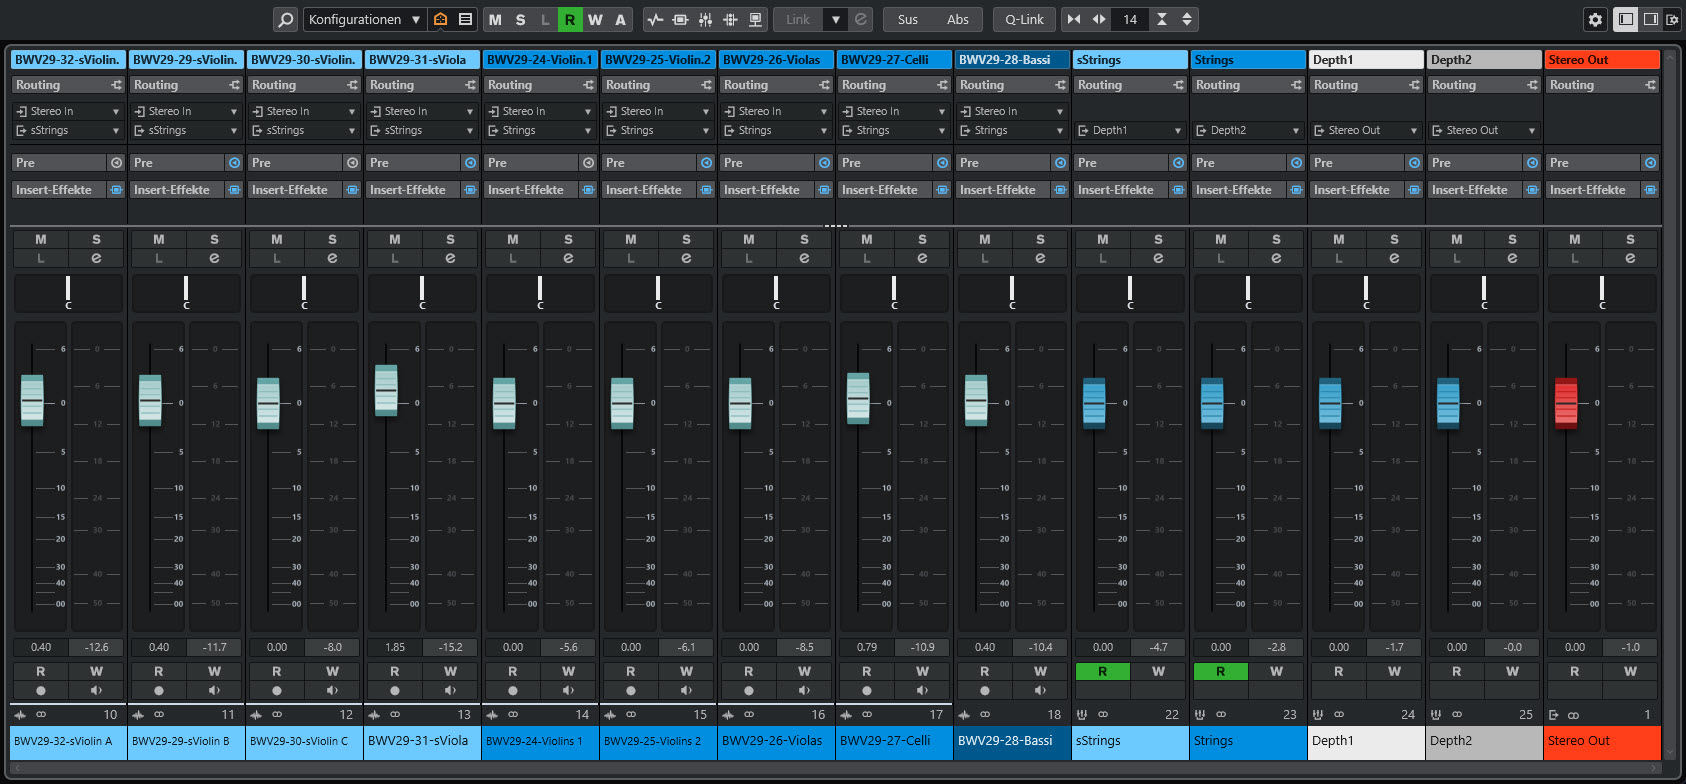
In Cubase it looks like this at the end: bwv29_mixprojekt_mixer_start.jpg
(click on the link to enlarge)

Finally, you can test your ‘wiring’ of the mixer: For example, press the solo button on the ‘DEPTH3’ group channel. The solo button should now also be pressed automatically on the ‘Brass’ group channel and also on the audio channels of all brass instruments.
Move strings to spatial depth Depth2
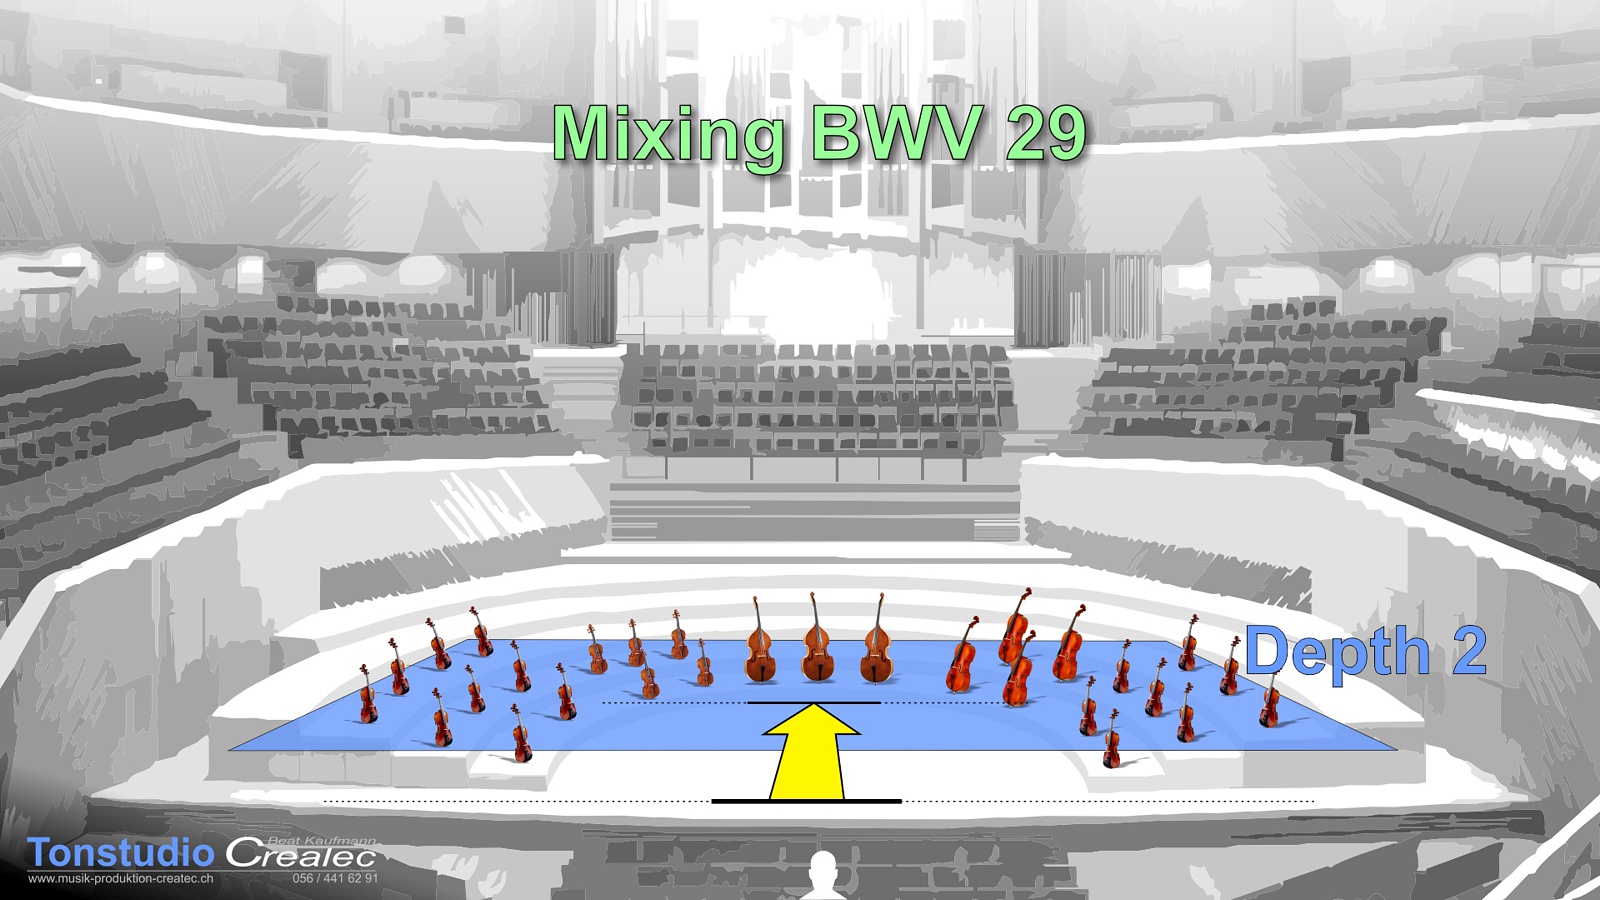
Let's start with the strings. As you can see in the picture on the right, they are a little way from the border of the stage. They are therefore routed through the room depth ‘Depth2’ after all the string tracks have been combined in the string group channel. So let's take a look at how to position all the strings at a certain spatial depth. In principle, you can do this with almost any reverb unit. You can see an example here: Creating Depths with BREEZE2 . To make it even easier for you, I have created a Impulse Respond (IR) [266 KB] , with which instruments can be pushed into the depth of the room simply by turning a knob.
How do I create spatial depth?
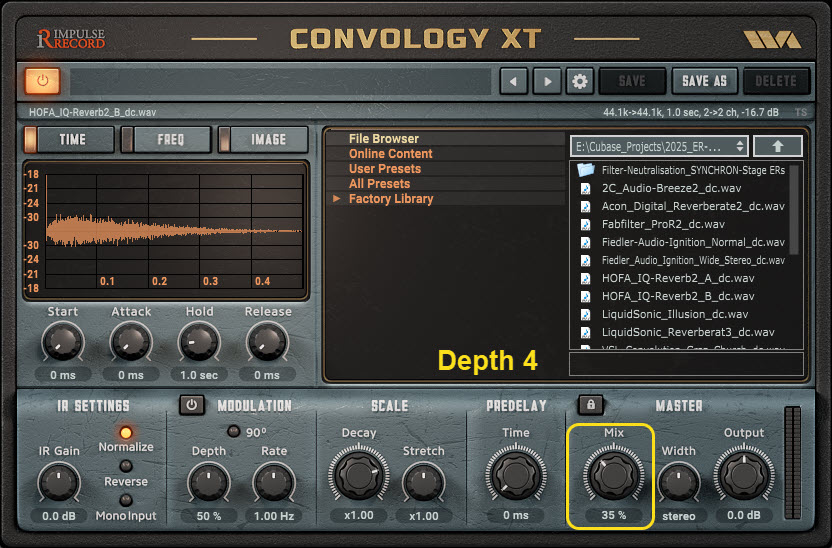
To play back the room impulse, I used the freeware Convolution Reverb ‘Convology’ of the Impulse Record company.
Install a Convology instance in the ‘Depth2’ group channel. Once the room impulse has been imported into Convology, all you have to do is turn the mix knob. The more ‘%-Wet’ you set, the further away the strings will play.
As an example, you will first hear a short percussion sequence with...
Mix control: 0% / 35% / 65% >>> Sound = close / medium distance / far away

|

|
As you can hear, the example does not contain a real reverb tail. My IR (Impulse Respond) is designed so that you can push the instruments into the room depths without a reverb tail. If you now install a reverb in the output channel of the mixer (as mentioned above), which adds (only) a reverb tail for all instruments, it sounds like this...
Listen again to the most distant percussion sound. Despite the great depth of the room, it is not drowned in reverberation. An advantage of this mixing technique.
Position strings in the spatial depth Depth2.

Now try moving the strings back a little using a Convology XT instance in Depth2. In my case, this results in mix values in the range of around 15 - 20%. Ideally, you should have studio monitors to adjust the room depth. This usually works less well with headphones.
Panning
Once the room depth has been set, you still need to position the instruments. How you want to do this is up to you. Of course, you can find out everything about this topic in more detail in the tutorial Mixing an Orchestra .
If you have set Depth2 and the strings are positioned, you should get a result that sounds something like this (still without the reverb tail in the output channel)
Solo strings in spatial Depth1

There are also three solo violins and a solo viola. Some of them have different parts to play than the other strings. It therefore makes sense to place them in a more soloistic position: ‘DEPTH 1’. In our case, this means at the front of the stage. Solo instruments that are to play in front of an entire orchestra are therefore not given any extra depth. In our case, the group channel ‘Depth1’ therefore remains without Convology XT. The solo strings will therefore only benefit from the reverb tail in the output channel. They will still play in the foreground - as long as the selected reverb tail does not push instruments into the depth at the same time.
Group channel Depth1 without effects?
Using entire group channels for the different room depths has the advantage of supporting the respective instrumental functions with additional effects. Since solo instruments are now being played in DEPTH 1, you could, for example, brighten the sound of all instruments with an EQ. This would make them stand out even more brilliantly against the orchestra. You could give the solo instruments more impact with a maximizer, etc. More on this and how to treat solo instruments can be found in the tutorial Mixing an Orchestra.
Panning
You also need to position the solo instruments from left to right. How you want to do this is up to you. Of course, you'll learn everything about this topic in quite a bit more detail in the Tutorial Mixing an Orchestra or here: Panning .
If you have set the depth1 (without Convology) and the instruments are positioned via panning, you should get a result that sounds something like this (still without reverb tail in the output channel)
Together with the orchestral strings—which play at depth 2—it sounds like this... (still without the reverb tail in the output channel)
Can you hear that the solo strings are playing in front of the orchestra?
Combined with the orchestral strings—which play in "DEPTH 2"—it sounds like this... now with the reverb tail in the output channel. Maybe the reverb tail is a bit overdone, but... great, isn't it?
Brass instruments in room depth 3
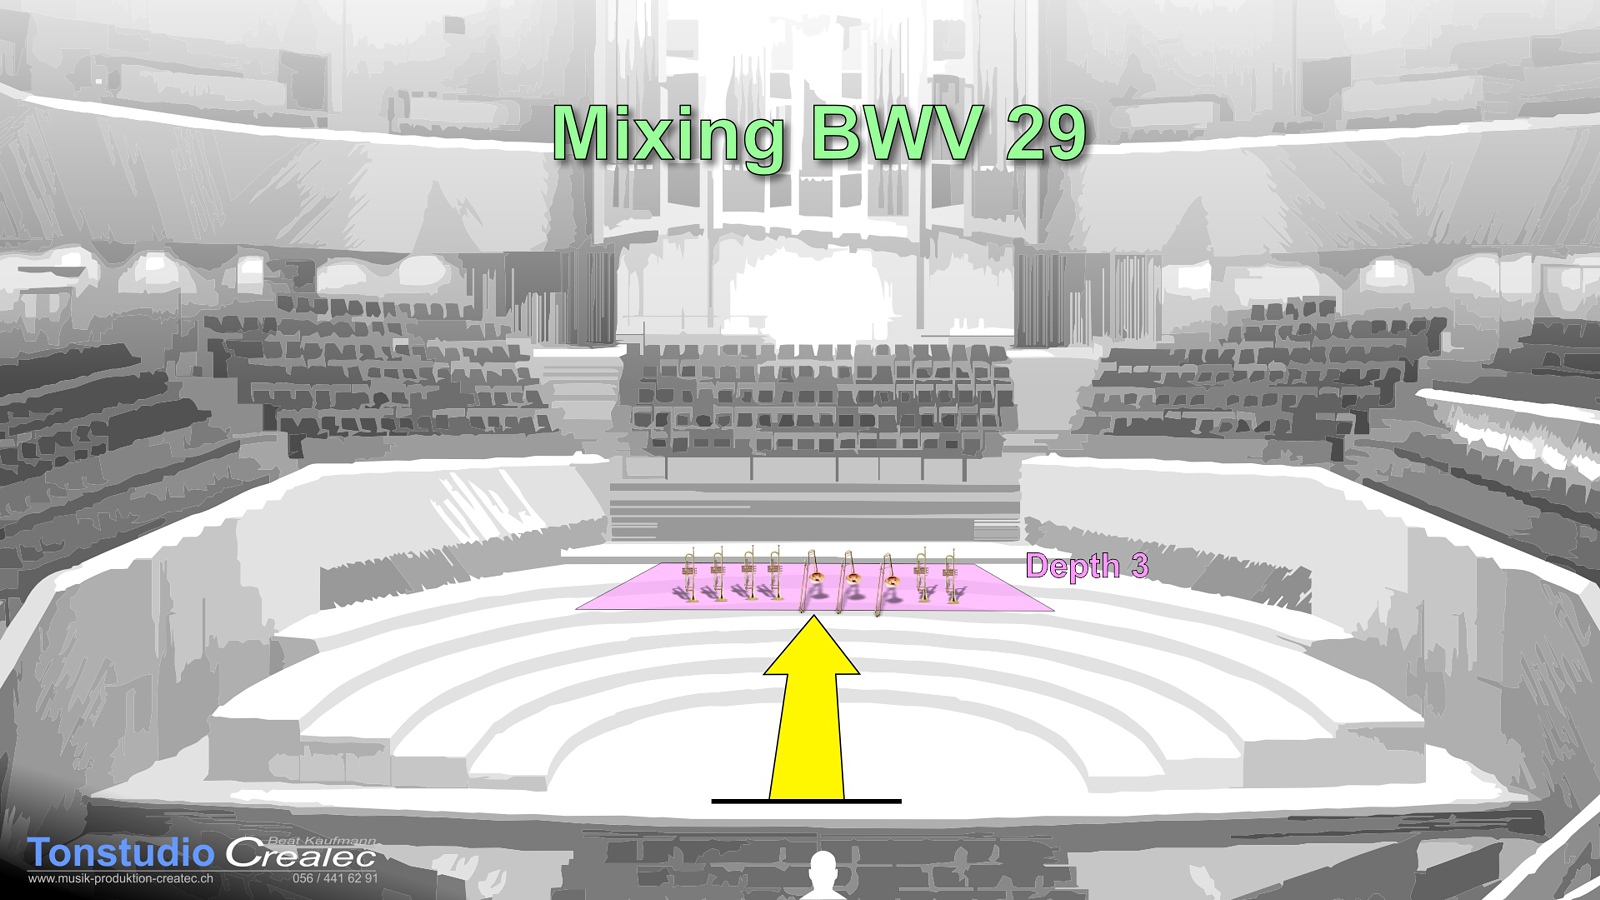
As the image on the right shows, brass instruments are positioned somewhere behind the strings, meaning they are set back further in the room's depth. How far back you want to acoustically set them back is entirely up to you. But don't lose the full depth of the room just yet, because the organ and timpani should be able to be moved even further back than the wind instruments.
Positioning brass instruments

Now, using a Convology XT instance in Depth3, try moving the brass instruments further back than the strings. I get mix values in the range of about 20-30%. Ideally, you have studio monitors to adjust the depth of the room. This step generally works less well with headphones than with studio monitors. Once you've set the correct depth, try positioning the three trumpets and the trombone slightly from left to right. Note: the full width is no longer available. The graphic of the concert hall illustrates this. The listener in the front perceives the brass instruments more in the center than, for example, the strings. You can learn more about this in the tutorial Mixing an Orchestra of coarse.
Additional effects in the Depth3 group channel

By pushing back the volume via audio effects, rear instruments often lose some of their natural punch. Sampled instruments, in particular, which are loud in real life, often lack the necessary power in the mix because the samples, from recorder to timpani, are all presented at the same volume. The group (bus) channel offers the opportunity to incorporate effects that restore the original power to the distant instruments. Of course, you can find out more about this in the tutorial Mixing an Orchestra .
Once you have set the depth3 and positioned the instruments, you should get a result that sounds something like this (still without reverb tail in the output channel)
... now with reverb tail in the output channel.
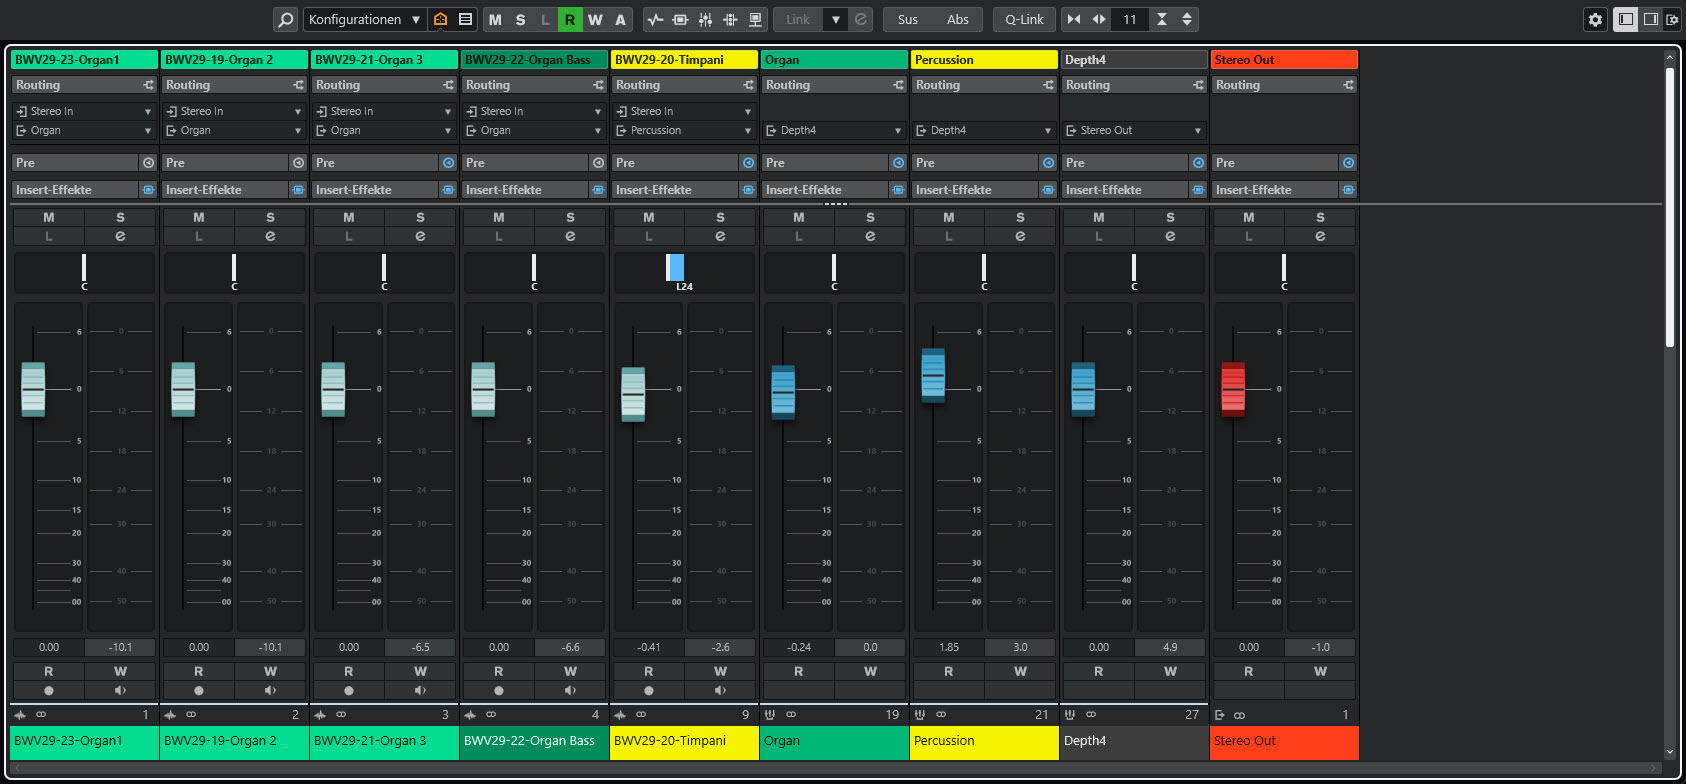
Stage Depth 4

The organ and timpani mark the back of the virtual stage. This should also make it acoustically clear that these are the instruments playing at the back of the stage. Of course, you could now set the Convology XT's mix control to 100%. But as with all effects, 100% never sounds truly great or natural.
Positioning the organ and timpani
While the organ remains in the center, the timpani must be moved slightly to the left. Incidentally, to make instruments appear farther away, one must also consider the associated physical conditions. Thus, for more distant instruments, the stereo width should be reduced. In our case, this applies especially to the organ. The timpani is more or less a point-like sound source. As always, you can learn more about this topic in the tutorial Mixing an Orchestra.
Additional effects in the Depth4 group channel
Even more so than in the "Depth3" group channel, the "Depth4" bus channel applies: Instruments at this distance often require some support in terms of pressure and power. It would be physically wrong to use an EQ to primarily boost the highs so that, for example, the timpani can cut through better. Compressors or some kind of booster effect are more appropriate here.
Don't fall into this trap...

Instruments that sound from a greater distance can't sound as brilliant as those playing at the front of the stage. If you undermine these physical conditions, you confuse our brains and thus destroy the naturalness of the mix. You'll learn more about this in the tutorial Mixing an Orchestra .
Reverb tail in the output channel
If you haven't already, you should now add a reverb to the output channel. Again, it's up to you to choose how much reverb tail you want and how long you want it to last. Concert halls often have reverberation times of 1.8 to 2.8 seconds. Churches and cathedrals have even longer reverb times. Since this is a rather fast and densely composed piece, shorter times are more suitable. If you have a dry/wet control on your reverb plugin, you'll probably end up with values around 10 to 20% wet.
As mentioned above, the reverb used here, in addition to providing a nice reverb tail, shouldn't also push the orchestra into the low register. This can be partially suppressed by setting the pre-delay value to around 50-80ms and reducing the early reflections if possible.
Find balance between Depth1, 2, 3, 4...
A very important step is now to adjust the relationship between the different room depths. Essentially, you are fulfilling the role of the conductor, who has to set the correct volumes at the front of the stage. Keep in mind that there is probably no fixed level setting. It will be more of a dynamic matter. Volume automation is called for. To give you an idea: Here is a link to a Youtube-Video dazu...
Additional effects in the output channel

Typically, a master compressor "glues" everything together. This is usually followed by the reverb effect, which provides the reverb tail (without early reflections). An EQ can provide final sound adjustments here. Then, perhaps, sound-enhancing or sound-enchanting effects are added. Finally, a limiter is always ideal, as it prevents any peaks from becoming trapped in the output signal. Limiters are not used to increase volume in classical music, as is common in pop and rock music. Nevertheless, they can be used to set a final level.
Use reference music

The final part of every mix is comparing your own mix with another, as naturally recorded piece of music as possible, one that has a musical style as similar as possible to your own. You should definitely do this comparison, because over time, our ears (or rather, our brains) become accustomed to even the most bizarre sound colorations. With such a comparison, it will immediately become apparent whether you have moved away from “sound reality” without noticing it.

Even after reading this simple mix description carefully, many questions will surely remain unanswered.
I'm confident you'll find answers to almost all of your questions in the Mixing an Orchestra tutorial. If you still have any questions, please contact me. I'll add to the tutorial (as I've done over the past few years). The tutorial will definitely take your mix to a higher level than just another EQ plug-in... and probably at a lower price.